
Last updated: 27 September 2026
Quick Answer
Dig a hole 600mm deep and 200mm wide, set the ground socket height with the galvanised pin, then concrete the socket and leave it 48 hours. The Clothesline Store guide covers the Austral FoldAway 45.
The Austral FoldAway Rotary Clotheslines are made to last, crafted with durability in mind to ensure you get years of reliable use. To make the most of your new clothesline, it's really important to follow the installation instructions carefully.

Getting the setup right is key, not only to avoid any potential damage to your clothesline but also to make sure you don't accidentally void the warranty. A little preparation now can go a long way in keeping your folding rotary clothesline working perfectly for years to come!

Parts supplied. 1 x Clothesline Handle Grip (Black), 1 x Clothesline Handle Shaft (Black), 1 x Clothesline Handle Back Cover (Black), and an accessory pack with 1 x 8mm x 150mm Galvanised Pin and 1 x Ground Socket Cap.
Before You Start
Before you begin, carefully read through the installation instructions provided with your new Austral FoldAway Rotary. Understanding each step will help the installation go smoothly and without any surprises.

While reviewing the instructions, check the contents of your FoldAway Rotary box. Tick off each item to confirm everything is included, and make sure you have all the necessary tools on hand. This will save you time and effort, helping you avoid delays.
Site Preparation
1. Select a suitable site. Choose a location that allows a minimum of 500mm clearance from the end of each arm, giving ample room for your washing to move freely.

2. Dig a hole. Dig a hole 600mm deep and 200mm in diameter. Fill the bottom with drainage gravel or stones so the Ground Socket's top lip sits just above ground level.
Height Setting
Important. If you're installing your new folding rotary clothesline on sloping ground, be mindful of the height setting so the arms pitch upwards correctly. Also consider the height of the person using it, and whether they'll stand in one place or move around the clothesline when hanging washing.

3. Install the head section. Slide the pre-corded Head Section into the top of the Column. The black plastic Cross, which bolts to the 4 arms, will slide down over the column. Stand the column upright and rotate the head section until the locking mechanism aligns. The head will drop once, then rotate again to drop a second time.

4. Set the height. The ground socket has multiple height settings, shown by partially hollowed holes on the side. Slide the Column into the Ground Socket and stand it upright, making sure the lip of the socket is just above ground level.

5. Adjust the height if needed. Raise the Head Section by carefully opening the arms, checking the lines aren't twisted or caught, especially at the arm tips. Make sure the arms move freely upward until the Cross meets the black plastic bush, then flip the latch to secure them together.
6. Select the height. With the arms raised and the clothesline wound down fully, check the head height clearance for the main person using it. Adjust by choosing a suitable height hole on the Ground Socket. The clothesline can be wound up 270mm from its lowest position, making the outer lines higher from the ground.
7. Set the pin. Once the correct height is set, fold down the Head Section, secure the arms with the Line Retainer and remove the Column from the Socket.

Place the Galvanised Pin into the selected height hole on the ground socket and use a hammer to punch the pin through, then repeat for the other side. The pin locks the column in place and sets the height.
Fitting the Austral Clothesline Handle
8. Attach the handle shaft. Insert the handle shaft into the handle grip, then push the split end of the shaft through the hole at the bottom of the handle. The split will expand and lock into place.

9. Attach the handle back cover. Clip the handle cover onto the back of the handle by pushing the pins into the locating holes, and press firmly to secure.
Concrete the Ground Socket
10. Mix the concrete. Quick-setting cement is recommended, or mix your own using 3 parts gravel, 1 part sand and 1 part cement. Add enough water to make the mix damp enough to hold together when squeezed by hand.

11. Install the ground socket. Stand the ground socket in the centre of the hole at the correct height setting. Open the head section and check the height and the level of the socket to the ground surface, adjusting as needed.

12. Fill the hole. Fold the arms down and fit the Line Retainer, making sure the handle faces the correct direction (towards the path). Add 50mm of gravel into the hole, then pour the concrete mix to fill the hole about halfway. Check the level of the Main Column and tamp the concrete to remove air pockets. Recheck the level and fill the hole to within 20mm of the top.

Tamp again to settle the concrete, then finish by filling the last 20mm with a mix of 2 parts sand and 1 part cement.
Curing time. Leave the hoist undisturbed for 48 hours to allow the concrete to fully set.

Important Information and Operating Instructions
Regular maintenance. To stop debris causing the hoist to seize, remove the hoist from the Ground Socket several times a year for cleaning.

Folding the rotary hoist. Wind the Head Section down, place your fingers on top of the Bush, and squeeze the Cross and Arms upward.

Lift the latch and gently lower the cross section to fold the arms down. Use the Line Retainer to secure the lines and prevent tangling during removal.

Removing the clothesline. Once the head section is folded down and secured, hold the Main Column with both hands, then lift and rotate it clockwise to remove it from the socket. Place the Socket Cap onto the Ground Socket to protect it.
Reinstalling the clothesline. Insert the hoist into the ground socket and gently lower it onto the Pin. Rotate the Main Column anti-clockwise until it locks securely into position.
Unfolding the head section. Remove the Line Retainer, grasp the arms and gently pull them outward. Raise the Cross as far as it will go, then lower the latch into the locked position.

Warning. If the Cross doesn't lift easily, the cords might be tangled. Carefully check the lines and never force the Cross into position.

Tightening the lines. Open the lever on the Line Tension Lock, then start from the inner lines and work outwards, pulling each cord tight as you go. Lock the lever back into place once all lines are tightened.
During use. Distribute washing evenly so the hoist rotates smoothly. If it's windy, wind the Head Section down into the locked position, and to rotate, simply pull on one arm. After use, wind the hoist back up so the Head Section can rotate freely in the breeze.

By following these instructions carefully, your Austral FoldAway Rotary Hoist will provide reliable and durable service for years. Enjoy your new clothesline!
Austral FoldAway 45 Specifications
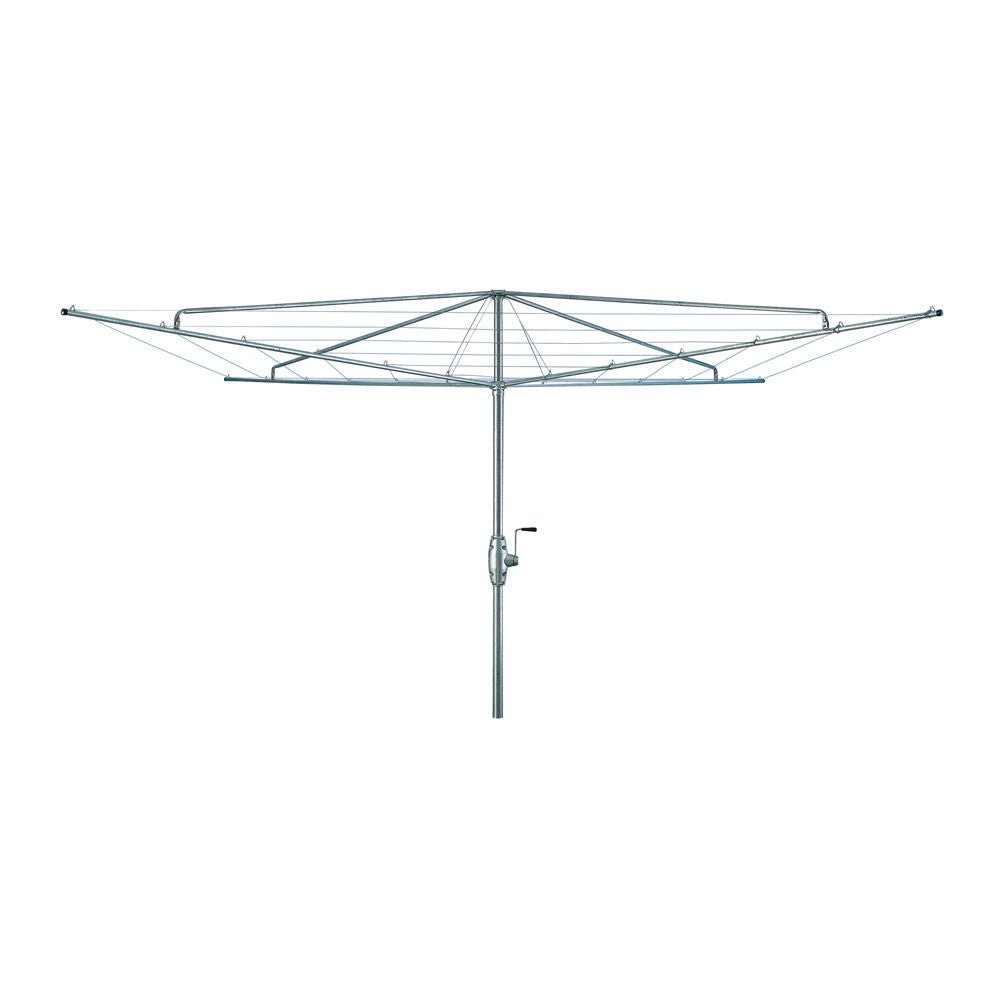
Model. Austral FoldAway 45 Rotary. Colours. Classic Cream, Woodland Grey, Cottage Green, Dune and Monument. Suitable for. 2 to 4 people, depending on your wash size. Lines. 7 lines of drying space. Longest line and sheet size. 2.2m, suits double sheets. Raises. 270mm. Hanging area. 45.5m. Head diameter. 3.3m, with 1.65m arm length. Recommended install space. 4.3m. Post diameter. 57mm. Ground socket. Included, with three install height options. Folding and removable. Yes. Assembly. Minimal, pre-wired. Gear casing and handle. UV-resistant plastic. Professional installation. Available for this folding rotary clothesline.

Professional Clothesline Installation Service
If you're not keen on installing your new clothesline, The Clothesline Store makes clothesline installation incredibly easy with a professional service that ensures your clothesline is set up effortlessly. Whether you're choosing a fold down, retractable or folding rotary clothesline, our expert installers cover Sydney, Melbourne, Brisbane, Adelaide and beyond, including Geelong, the Gold Coast and Newcastle.

To book, simply select "Yes, Install My Clothesline" or "Yes, Install and Remove Old Clothesline" when placing your order. Pick your clothesline, choose the clothesline installation option, and you're on your way.
Top tip. Not all clothesline retailers offer installation, so if installation or removal is important to you, make sure these services are available before you buy.
Want Your Yard Back? Consider a Fold Down
If you'd rather not have a rotary in the middle of the yard, an Air Dry fold down clothesline gives generous hanging space and folds flat against a wall or ground mount legs. It's 100% Australian made from 100% Australian steel, in a wide range of ready made sizes or made to order for the perfect fit.
Related Guides from The Clothesline Store
Find out how to measure for a new rotary clothesline, what's hot in the market like the top selling drying racks and why they are loved in Australia, and view the best Australian made fold down clothesline.
FAQs: Installing the Austral FoldAway 45
How deep should the hole be for an Austral FoldAway 45?
Dig a hole 600mm deep and 200mm in diameter, with drainage gravel at the base so the socket lip sits just above ground level.
How much space does the FoldAway 45 need?
It has a 3.3m head diameter with a recommended install space of 4.3m, allowing at least 500mm clearance from the end of each arm.
How do I set the height?
Choose one of the height holes on the ground socket and punch the galvanised pin through. The clothesline can also be wound up 270mm from its lowest position.
How long before I can use it?
Leave the hoist undisturbed for 48 hours to allow the concrete to fully set.
Can the FoldAway 45 be removed from the ground?
Yes. Fold the head down, then lift and rotate the column clockwise to remove it, and fit the Socket Cap to protect the ground socket.
Where can I buy the Austral FoldAway 45?
Online from The Clothesline Store, Australia's largest private clothesline stockist since 2003, with a 4.9 out of 5 star customer rating.
Shipped Direct From Our Warehouse
As Australia's largest private stockholder of clotheslines and accessories, The Clothesline Store ships in-stock items the same or next business day from our own national warehouse, with a 4.9 out of 5 star customer rating.

Clothesline Covers for Your Clothesline
Clothesline covers protect your clothing from the harsh Australian UV rays. A ClevaCover clothesline cover gives your washing high UV protection from the Australian sunlight while it dries, and shelters it from overhead rain, bird droppings and falling leaves, so you can hang your washing out and leave it with confidence.
ClevaCover for fold down clotheslines. Fits Air Dry, Hills Folding Frame, Austral, Eco, Daytek and other fold down brands, mounted on a wall or ground mount legs.
ClevaCover for folding rotary clotheslines. Fits Hills, Austral and Daytek folding rotary clotheslines.
ClevaCover for fixed head rotary clotheslines. Fits Hills Hoist and Austral fixed head rotary clotheslines, giving shade across the whole hanging area.